Feedback Form
|
|
Start of Tutorial > Start of Trail > Start of Lesson |
Search
Feedback Form |
[NOTE: This is an early draft of documentation onSpringLayout. We're publishing it before its completion so that you can get examples and a bit of explanation as soon as possible. If you have suggestions for this page, please send us mail.]The
SpringLayoutclass was added in v 1.4 to support layout in GUI builders. It produces layouts that are similar to absolute positioning, but that react more appropriately to container resizing, changes in text and font, and so on.
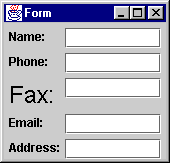
SpringLayoutcan produce many kinds of layouts. Here are pictures of three configurations produced by spring layout:

The first window, labeled "Form" (and described in Springs in the Form Example), uses a
SpringLayoutto align pairs of items -- in this case, labels with text fields. The second, labeled "Test" (implemented inGrid.java), uses a
SpringLayoutto create rows and columns, similar to what aGridLayoutdoes. Unlike grid layout, however, this example makes the grid as compact as possible. The third window, labeled "SpringLayout", creates a single-row layout similar to the default layout produced by aFlowLayout. It's discussed in the section Example: SpringWindow.
Spring layouts do their job by defining relationships between the edges of components. For example, you might define that the left edge of one component is a fixed distance (5 pixels, say) from the right edge of another component. By default, a spring layout defines the width and height of a component (the distance between its left and right edges and between its top and bottom edges) to be somewhere between the component's minimum and maximum sizes -- if possible, at its preferred size.Distances between edges are represented by
Springobjects. Each spring has four properties -- its minimum, preferred, and maximum values, and its actual (current) value. The springs associated with each component are collected into aSpringLayout.Constraintsobject.
This section takes you through the typical steps of specifying the constraints for a container that usesSpringLayout. The first example,SpringWindow1.java, is a modified version of the
FlowWindowapplication. . It just creates aSpringLayout, sets it as the layout manager for a frame's content pane, and then adds components to the content pane. Here's the relevant code:Here's what the GUI looks like when it first comes up:public class SpringWindow1 extends JFrame { public SpringWindow1() { Container contentPane = getContentPane(); contentPane.setLayout(new SpringLayout()); contentPane.add(new JButton("Button 1")); contentPane.add(new JButton("2")); contentPane.add(new JButton("Button 3")); contentPane.add(new JButton("Long-Named Button 4")); contentPane.add(new JButton("Button 5")); ... } public static void main(String args[]) { SpringWindow1 window = new SpringWindow1(); ... window.pack(); window.setVisible(true); } }
Here's what it looks like when it's resized to be bigger: Obviously, we have a problem. Not only does the frame come up way too small, but even when it's resized the components all are located at (0,0). This happens because we have set no springs specifying the components' positions and the width of the container. One small consolation is that at least the buttons are at their preferred sizes -- we get that for free from the default springs created by SpringLayoutfor each component.Our next example,
SpringWindow2.java, improves the situation a bit by specifying x and y locations for each component. In this example, we'll specify that all the components appear at their preferred size in a single row. Each component will be exactly 5 pixels away from each other component. The following code specifies the locations (
parentis the content pane):The red lines of code set the springs that determine the x and y coordinates of each component in the container. The y coordinate is always 5. The x coordinate is set so that the components are always 5 pixels apart, horizontally. For example, the first component's origin is at x=5. The second component's x coordinate is 5 + the first component's width. The third component's is at 5 + the first component's width + 5 + the second component's width. And so on. We use theComponent[] components = parent.getComponents(); SpringLayout layout = (SpringLayout)parent.getLayout();; Spring xPad = Spring.constant(5); Spring ySpring = Spring.constant(5); Spring xSpring = xPad; // Make every component 5 pixels away from the component to its left. for (int i = 0; i < components.length; i++) { SpringLayout.Constraints cons = layout.getConstraints(components[i]); cons.setX(xSpring); xSpring = Spring.sum(xPad, cons.getConstraint("East")); cons.setY(ySpring); }Spring.summethod to create aSpringthat depends on the values of other springs.The previous example still has the problem of the container coming up too small:
But when we resize the window, every component is in its place:
To make the container the initially appear at the right size, we need to set springs between its right (east) and left edges, and between its bottom (south) and top edges. Here is the code that does this (taken from
SpringWindow3.java):
Finally, the window comes up at the right size:Spring maxHeightSpring = Spring.constant(0); for (int i = 0; i < components.length; i++) { ... maxHeightSpring = Spring.max(maxHeightSpring, cons.getConstraint("South")); //cons is the SpringLayout.Constraints object for components[i] ... } // Make the window's preferred size depend on its components. SpringLayout.Constraints pCons = layout.getConstraints(parent); pCons.setConstraint("East", xSpring); pCons.setConstraint("South", Spring.sum(maxHeightSpring, ySpring));
The following figure shows the important horizontal springs used in the Formapplication (Form.java). It doesn't show the default springs that control each label's width. Leaving these springs at the default means that each label appears at its preferred width. [PENDING: Explain the figure in more detail.]
[PENDING: Discuss/show the vertical springs?] [PENDING: Discuss the intricacies of working with springs. Discuss proxies vs. original Springs.]
TheSpringLayoutclass has a single constructor, which takes no argument:[PENDING: Discuss the important API forpublic SpringLayout()SpringLayout,SpringLayout.Constraints, and
Spring.]
The following table lists the examples that use spring layout.
Example Where Described Notes SpringWindow3This page Uses SpringLayoutto create a row of evenly spaced, natural-size components.FormThis page Uses SpringLayoutto align labels with text fields.GridThis page Uses SpringLayoutto create a compact grid.
|
|
Start of Tutorial > Start of Trail > Start of Lesson |
Search
Feedback Form |
Copyright 1995-2001 Sun Microsystems, Inc. All rights reserved.